Journal
Building the inline form system
After detailing the design approach for inline forms in the previous post, I spent the past few days building the first one, for clients. I’m thrilled with the implementation, which avoids repetition and keeps the main form clean. Along the way, I built several components that make everything easily composable, like the StackedModal and the ScrollContainer. I also established an approach for interacting with the API within a “subview”, so not all API interactions need to go through the main form view. Using this pattern, I believe the other inline forms will be a breeze compared to this first one.
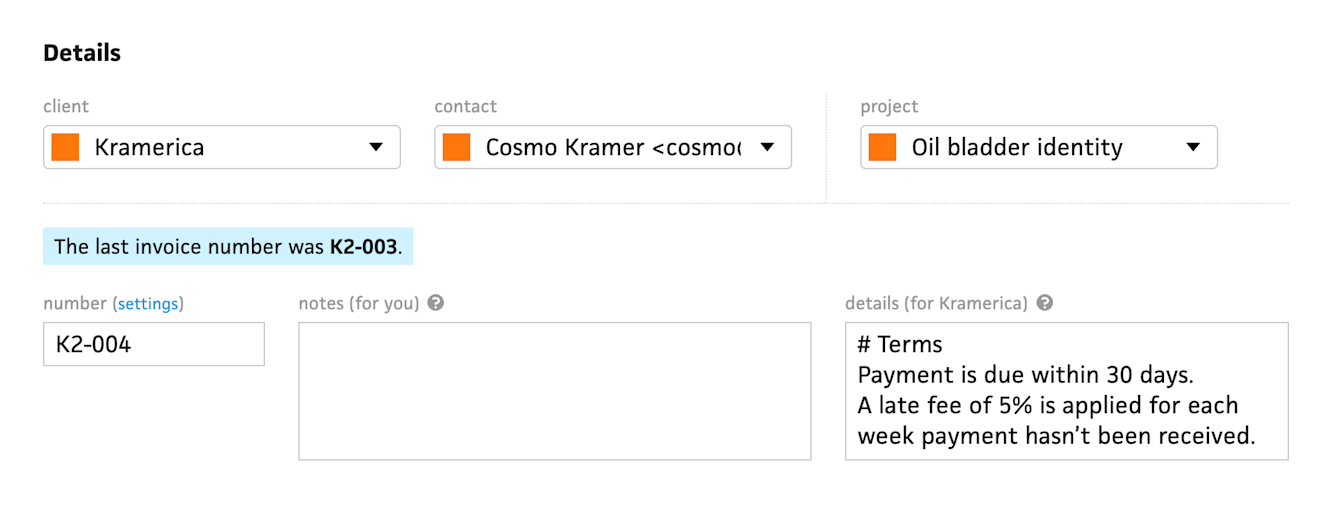
I started by using the new form components to compose a basic client form. This was probably the easiest part of the process, since I’m essentially writing markup with minimal JavaScript to wire up the form. The new design system’s rectangular form fields make the layout a piece of cake—the fields simply lock into place.
This block-based approach was born from my grievances with the existing app’s forms, where spacing form elements was an intricate process, like building a house of cards. Depending on which form element sits next to another, I either need to adjust the margin, put a divider between them, or stack a group of elements. This leads to a ton of one-off, brittle CSS selectors that need to be re-evaluated whenever a new element makes its way into the form.
Now that the new fields are self-contained within a border, all of that custom CSS goes away. The only adjustments I might need to make are for grid layout as it reflows down to mobile. In the case of the inline client form, all the fields stack vertically, so I don’t need to bother with the grid layout yet.
Next, I tackled the inline form’s container, which slides into view as the user requests to create a client inline. This behavior is essentially the same as my existing modal window system, but with a different transition and layout. Because of this, I realized I could extract the concept of a “modal” from meaning “a centered window with a dimmed background” to simply “a window with a dimmed background”.

This lets me replace the existing modal component with a CenteredModal component, which centers its window, and a StackedModal, which right-aligns its window. Both of them share the underlying modal behavior of a background that fades in upon mounting and exits when clicked.
Within the modals, I’m able to compose my Window component. Previously, this component assumed that it centered itself within the modal, but now that there are centered and stacked modals, it can either be centered or full-height and right-aligned. Surprisingly, I only needed to adjust the rounded corners for the stacked modal window, and it just worked.

Inside a window, I can insert the WindowHeader component, which contains the title and close button. This then emits its close event through the modal, so the parent of the modal simply needs to listen for a single close event, instead of individually listening for the background click and the button click. When I implement keyboard shortcuts, I’m also going to include the ability to close a modal using the escape key, as one should.
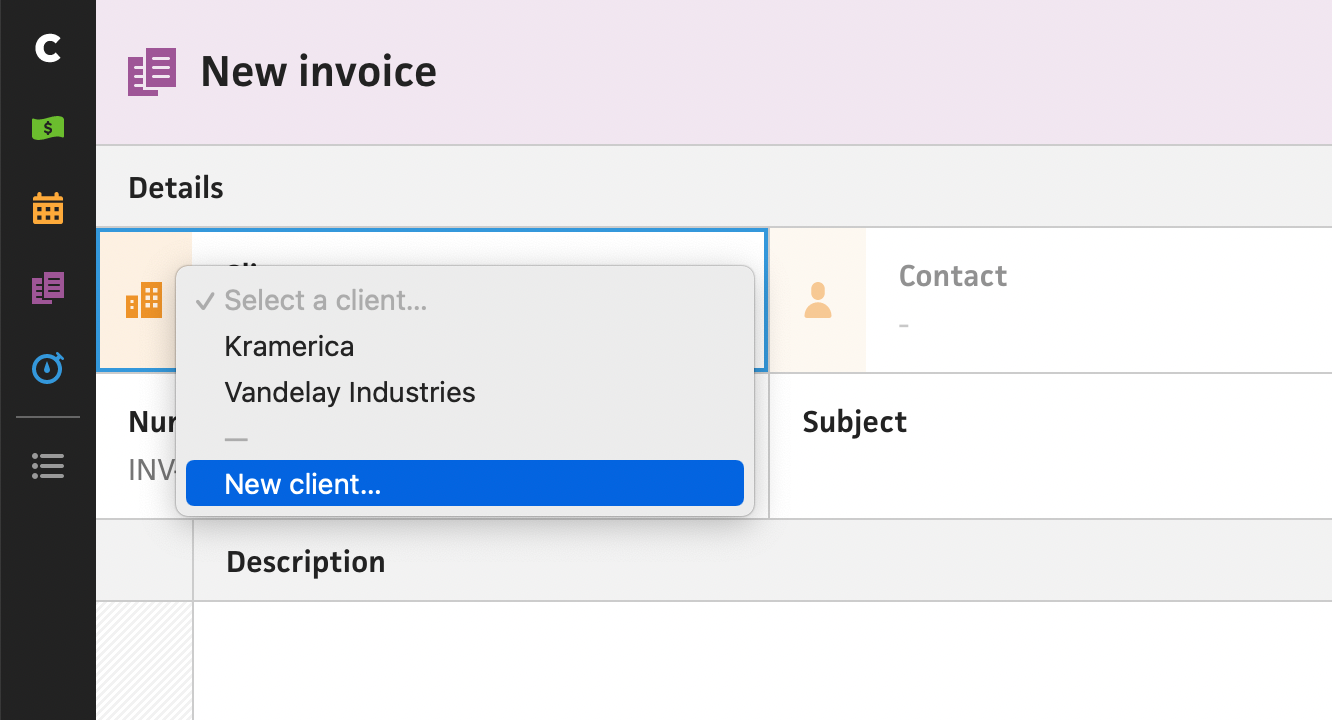
With the stacked window ready to go, I added the ability for my SelectField component to have “actions”. This is a familiar approach carried over from the existing app, where actions like “New client…” can be added to the bottom of a select dropdown. Selecting that menu item emits an action event, but maintains the value of the select field. At first, I wired this up to create the client form state from the invoice form view, but I immediately foresaw a future of me copy/pasting this with every inline form, and the invoice form view spiraling into madness. To avoid this dark future, I established the concept of a “subview”. I’ll explain.
In the new system, I’m determined to keep API calls out of reusable components, which is a no-brainer for most, but can sometimes happen in an app—especially one that’s been migrated through multiple front-end stacks over the course of seven years. To keep this promise to myself, I defined a “view” as a component that’s mounted by the routing system and acts as the bridge between the API and the view’s children. This means that the InvoiceForm, which houses all the form elements and form behavior, actually lives within an InvoiceFormView—a wrapper component that handles all the communication with the API.
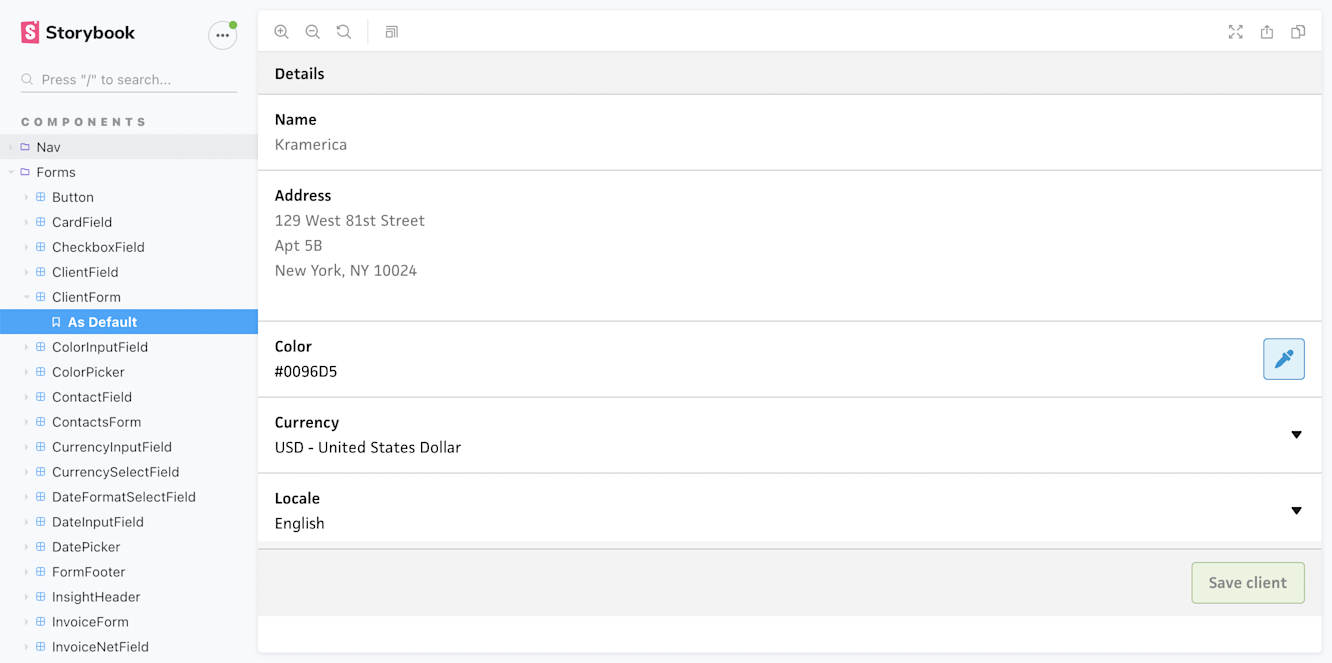
Keeping API requests out of the form components lets me build the entire invoice form within a sandbox, like Storybook. Then, I can handle the submit event however I want—independent of a remote backend. If I want to build a “demo” version of the app that stores everything within a local session, like my “test mode” idea, I can easily wire the submit event to a local store instead of the API.
Now that’s the “view”, but what about this “subview” I mentioned? While the “view” handles the API interaction of the main form, the “subview” handles the API interaction of inline forms, like modals. In this case, the invoice form is a “view” that talks to the invoice API while the stacked client modal is a “subview” that communicates with the client API.
Because the invoice view has no knowledge of what the client modal is doing, it simply needs to listen for a change event that returns the new client model. If the user closes the modal without creating a client, then the modal never emits a new client, and it’s as if nothing ever happened. Also, because the subview handles its own form state, like disabling the form while saving or showing an error, the only thing the main view cares about is whether a model is returned.
<AppLayout>
  <InvoiceForm
    ...
  />
  <ClientFormSubview
    :isOpen="isClientFormOpen"
    @change="handleNewClient"
    @close="isClientFormOpen = false"
  />
</AppLayout>
With this subview approach, I can now insert the client form subview into any form, listen for a new client, and that alone gives me the ability to create clients inline. This is significant. For the client form subview alone, I’ll be able to use this component for the project form, invoice form, workload form, and time entry form. Anything that’s connected to a client will have the ability to create a new client inline for free. I’m ecstatic.
As for what’s next, I’ll now go down the line of the remaining inline forms I need for the new invoice form. Off the top of my head, this includes ones for editing contacts, creating projects, managing tax rates, and importing time entries. This seems like a lot, and it is, but it’s so much easier now that I have this inline subview system set up.